The purpose of this site is to build an active community for UIMinds, PHP, HTML, JavaScript, Jquery Developers and UI/UX Designers to Network, Exchange ideas and talk about Code, Architecture, Innovation, and open source in general. Share the Open Source, Examples, Inspirations and best practices.
There has been an extremely basic vertical for the PHP engineers out there to completed Object Oriented approach to manage their application; now it is totally possible with CakePHP. Other than various components that are typical with numerous web structures, CakePHP goes with inbuilt support for ORM i.e. Protest Relational Mapper. Here, the PHP architect is sufficiently given space to play around the database. In reality, the database tables are changed into Objects; and different operations over the table are performed by different limits. This is definitely not hard to prepare for any web planner. Also, it is all around equipped with CRUD stage i.e. Database operations like Create, Read, Update and Delete are performed in such a trouble interstate, to the point that the PHP engineers require not contemplate the establishment database questions for any modification of the database. Everything is done in a smoother route by the framework without giving any misery to the fashioner. In like manner, the web originator can focus more over the focal justification and imaginative considerations instead of running behind the database stuffs. As the database is under the control of CakePHP, any alteration in the application will automate the general changes of the application without adjusting the code at every place. This develops the compel of the Object Oriented approach of CakePHP.
CakePHP Framework is more made. It is just the accompanying level change of PHP. Despite being sorted out and versatile, it in like manner offers additional sincerely strong system in a blaze. The CRUD great position of CakePHP enables a web organizer to seek after the profitable codes and execute those codes in a less requesting course after generally researching those codes. Of course, Model View Controller (MVC) coding, plan moreover helps the designers to complete the troublesome coding errands in a more capable manner. It helps an architect to save the inquiries to the database. Revealing a change in the database like implant, delete or alter the model is altogether straightforward with this framework.
CakePHP helps in making and passing on capable site furthermore save the important time of a specialist. The architect needs to make a little code, in connection with various structures. It moreover minimizes TAT (pivot time) and helps the architects in altering the URL structure by modifying code at a lone spot, as opposed to doing solitary changes in the coding plan. Another extra great position of the CakePHP based applications is that it requires a little setup and run effectively on all contraptions and projects.
The security of any site is astoundingly based on CakePHP in view of a couple of inbuilt segments like SQL infusion counteractive action, CSRF protection, and information approval. With these lucrative segments, CakePHP stage is in vogue and each business or organization is focusing on this phase for a solid and shaking presentation on the Internet.
CakePHP is a champion among the most fiscally keen and supportive frameworks for web planners of the 21st century. It has made the web application change, get ready less demanding and speedier.
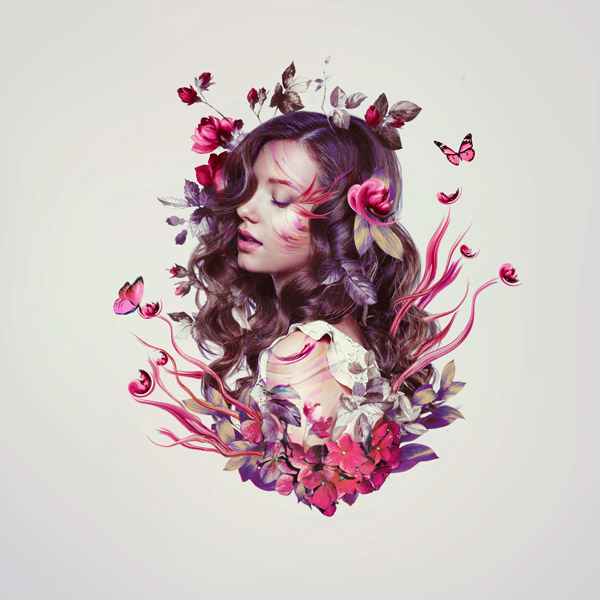
In this tutorial I'll show you how to create a floral portrait of a woman with flowers, leaves, branches and butterflies. We'll not only combine different images using standard blending techniques but also learn how to make abstract elements. We'll also use filters and enhance the color to achieve a fresh and creative result.
Tutorial Assets
The following assets were used during the production of this tutorial:
Model
Branch
Flower 1
Flowers 2
Flowers 3
Butterfly 1
Butterfly 2
1. Add the Background
Step 1
Create a new 1500 x 1500 px document in Photoshop with the following settings:
Step 2
Go to Layer > New Fill Layer > Solid Color and pick the color #e4dbe7:
Step 3
Select Layer > New Adjustment Layer > Curves and decrease the lightness a bit:
On this layer mask, use a soft round brush with black color (soft black brush) and Opacity about 20-30% to paint on the middle of the canvas to make this area a bit brighter than the edges. It will help to focus on the center. Here are the results on the mask and on the picture:
2. Add the Model
Step 1
Open the model image and isolate her from the background using your favorite method. In this case, I used a layer mask with a hard black brush. Create a new fill layer between the background and the isolated model and pick any light colors.
Step 2
Create two new layers and use a soft brush with the colors #331f18 and #9c7966 (these colors are picked from the head) to fill in the hair.
Step 3
Hide the background and the fill layer and hit Control-Shift-Alt-E to merge all the transparent layers into a new one. Move the merged model into our main canvas using the Move Tool (V):
Click the second icon at the bottom of the Layers panel to add a mask to this layer. Use a medium-soft black brush to remove the bottom of the model's body:
Step 4
Use a Hue/Saturation adjustment layer set as Clipping Mask to desaturate the model. Change the Mastersettings as the screenshot below shows:
Step 5
Make a Curves adjustment layer to brighten the model. On this layer mask, use a soft black brush to erase the areas which are bright already.
3. Make the Branches
Step 1
First we'll be making the abstract branches. Open the flower 1 image. Isolate the flower using the Magic Wand Tool (W) and add it to the main canvas. Go to Filter > Liquify and choose the Forward Warp Tool. Set the brush size to about 300 px (it depends on the flower size you've chosen). Stretch it to change the shape and make it much longer, like a curvy branch:
Step 2
Duplicate this layer many times and liquify them to get results in a similar style to the first. Arrange them on both sides of the model.
Step 3
Select all of these layers, press Control-G to make a group for them, and change this group mode to Normal 100%. Add a mask to this group and use a medium-soft black brush to erase the bottom of some of the branches to make them look as if they're growing from the model's body.
Step 4
Duplicate several branches, make them smaller and move them to the eye:
Step 5
Create a Hue/Saturation adjustment layer within this group to change the branches' color.
Step 6
Use a Curves adjustment layer to darken the branches:
Step 7
Open the branch image and cut it out from the white background. Add it to the bottom of the model's body and duplicate it. Flip it horizontally by choosing Edit > Transform > Flip Horizontal. Place these layers under the abstract branches group.
Add a mask to each of these layers and clear their bottom.
Step 8
Duplicate them several times and arrange them around the bottom of the model's body and her head. Use the Free Transform Tool (Control-T) to vary their size and position.
Step 9
Make a group for these branches and add a Color Balance adjustment layer. Increase the Red value of the Midtones:
Step 10
Use a Photo Filter adjustment layer and pick the color #ec0075:
4. Add the Flowers
Step 1
Open the flowers 3 image and isolate the flowers using the Magic Wand Tool. Place the image at the bottom of the model and cover the holes between the leaves and branches.
Use a layer mask to blend the flowers with the existing elements:
Step 2
Create a Color Balance adjustment layer and change the Midtones and Highlights settings:
Step 3
Use a Hue/Saturation adjustment layer and change the Master settings:
Step 4
Make a Curves adjustment layer and increase the lightness to make the flower brighter:
Step 5
Open the flowers 2 image and cut the flowers out as you did with the other elements. Move it into the main document and rotate the side with the flowers and buds in the direction of the eyes.
Here is the result after masking off the parts covering the face:
Step 6
Duplicate this several times and arrange them around the model. Use a layer mask to delete the areas you don't want to show on the picture.
Step 7
Use the Lasso Tool (L) to select the flower on the top of the model, and press Control-J to duplicate this flower on a new layer. Choose the Liquify Tool and pick the Twirl Clockwise Tool to bend and tweak this flower to make it appear like an abstract one. Feel free to form it in the way you want but keep it still looking like a flower, so don't tweak it too much. Place it on the left of the head area with the leaves.
Step 8
Duplicate this flower several times and continue bending them to make them appear different but still in a similar style. Place them above the top of the abstract branches and on the arm.
Step 9
Make a group for all the elements made from the flowers 2 image. Use a Hue/Saturation adjustment layer and reduce the Saturation value to -40:
5. Create the Abstract Makeup
Step 1
We'll be going through a very interesting stage. Press D to turn the foreground and background to default (black and white). Create a new layer on top of the layers and use the Elliptical Marquee Tool (M) to draw a circle on the canvas. Go to Filter > Render > Clouds:
Press Control-D to deselect this circle and go to Filter > Pixelate > Pointillize. Set the Cell Size to 67:
Step 2
Tweak this circle using the Liquify Tools to get a result similar to the one below, or any shapes you wish for.
Step 3
Change this layer mode to Soft Light 100% and use a layer mask to make the effect visible only on the model's cheek:
Step 4
Duplicate this layer twice and move them to the forehead and arm. Mask off the unwanted details to make the effect subtle and soft.
Step 5
Create a group for these layers (remember to change the group mode to Soft Light 100%) and use an Invert adjustment layer to invert the effect color:
6. Add the Butterflies
Step 1
Open the butterfly 1 image and isolate the butterflies from the background. Select the middle butterfly and place it above the highest abstract flower on the right side.
Step 2
Use a Hue/Saturation adjustment layer to make the butterfly more saturated:
Step 3
Open the butterfly 2 image. Take the blue butterfly on the top left and move it above the highest abstract flower on the left of the main document:
Step 4
Change the butterfly color using a Hue/Saturation adjustment layer:
Step 5
Use a Curves adjustment layer to make the butterfly brighter:
7. The Final Adjustment
Step 1
We've finished adding the elements, and now it's time to change the color. Create a Color Fill layer on top of the layers and pick the color #1f0901. Set this layer mode to Exclusion 100%:
Step 2
Make a Color Balance adjustment layer and change the Midtones and Highlights values:
Step 3
Add a Curves adjustment layer to change the contrast and color of the whole image:
Step 4
Make a Photo Filter adjustment layer and pick the color #bbb85d:
Step 5
Create another Photo Filter adjustment layer and select the color #f7014c. On this layer mask, use a soft black brush to reduce the effect on the edges and the model's face. This aims to avoid making the color effect look flat.
Step 6
Use a Selective Color adjustment layer to alter the color of the leaves and butterfly 1.
Step 7
Add a Vibrance adjustment layer to enhance the effect. You know it's my all-time favorite adjustment layer!
Step 8
Make a Levels adjustment layer and decrease the Midtones value. Select this layer mask and paint on the middle to make the edges a bit darker. It helps to create a subtle vignette effect.
Congratulations, You're Done!
I hope that you've learned something useful for your future projects. Feel free to share with your friends. Enjoy Photoshopping!